Planting & Care Instructions
Before planting your pots, there are a few steps you can take to make your investments last as long as possible. All our Vietnamese Black Clay and Glazed pottery, as well as the Rustic Pottery from China, is rated to stay outside all year long without any additional prep; but one step you can take to increase the durability of your pottery is to seal any part of the pot that isn’t glazed, usually the inside and the bottom. This step is not required; rather it will simply enhance the durability of the pottery by allowing the water to flow out the bottom of the pot instead of being absorbed by the clay. If you decide to seal the pots before planting, the best product to use is concrete sealer from one of the big box stores and apply it per product instructions. You can also use a tile sealer or deck sealer like Thompson’s Water Seal, if you have it at home already.
When placing your pots in a landscape, we discourage customers from placing the pots directly on dirt or bark. These surfaces hold water and will cause the pots to absorb that water through its base during the winter months. Roots from other plants can also grow up through the drain hole and clog it, leading to premature cracking. Instead, place your pots on a solid, well-draining base like flagstone or gravel. If you are partially burying the pots in your landscape, dig a hole that is 8″-12″ wider than the pot and surround it with a medium to large gravel to promote good drainage. Failure to follow these steps can lead to the premature degradation of your pottery
When planting your pots, there are a couple tips to keep in mind. DO NOT USE REGULAR DIRT IN YOUR POTS, USE ONLY POTTING SOIL. Regular dirt is too dense and doesn’t release moisture quickly enough. This WILL lead to premature degradation of the pottery and poor drainage.
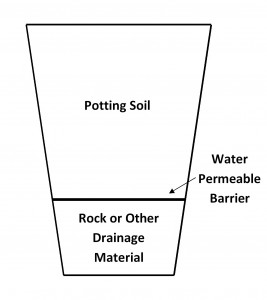
With pots that exceed 20″ deep, it is recommended that a layer of rock or chunk-style foam (which we can sell to you at the store) be used at the bottom of the pot to promote good drainage. First, measure the interior height of the pot and subtract 18″; this will give you the maximum height of drainage material you need to use. Second, simply place your chosen material into the pot; if using rock don’t pour it in, as this could crack the bottom of your pot. Next, a water-permeable barrier should be laid down to prevent the potting soil from mixing with the drainage material, thus preserving the material’s drainage qualities. Some examples of this barrier includes weed cloth or weed barrier (available at the store), burlap, and metal or plastic screen used for screen doors. Once the barrier has been laid down, fill the rest of the pot with a good quality potting soil and you are ready to plant.
If you are using a drip system to water your pots and don’t want the unsightly look of a drip line laying over the side of the pot, put your pot on pot feet and run the drip line through one of the drain holes in the bottom of the pot. Tape the tubing to the inside wall of the pot and then add your potting soil and drainage material. Be sure to leave a few extra feet of line at the top of the pot so you don’t come up short after you have put in all your soil and plants.
If you are watering your plants, and there is a significant amount of water draining out the bottom of the pot, you are using too much water at one time. Any water draining out the bottom is wasted water and can’t be used by the plants. It is better to water your pots more often with a smaller volume of water. This will keep you plants looking good and prevent your concrete or deck from becoming stained.
All our pottery is considered “frost-free” and can be left outside all winter. But if you so desire, there are also a few steps to take to winterize your pots. If they are small and can be brought into your garage, this is always ideal, but not required. For larger pots, follow these three steps:
- Just before the temperatures at night reach freezing (usually early November in Boise), stop watering the plants and clear out all plant material. This will allow the soil in the pot to fully drain and dry out.
- If you desire, you can cover pot with a plastic bag or other water proof cover and secure at the bottom. This will keep all snow, ice, and frost off your pot. To have a more decorative cover, patio furniture covers can be used; or, if you are handy with a sewing machine, you may make your own. If you have a perennial that does not die back or small tree in your pot, do not cover it as this could harm the plant.
- Keep them covered until early march, or until you are ready to plant in the spring.
Hint: For some of the larger Chinese glazed pots, it can be difficult to move them into your garage. By placing the pot on a plant stand with rollers, you can more easily move it into your garage. And remember, you MUST ALWAYS bring in any Malaysian or Terra Cotta pottery. If you do not, the pots could start to degrade in as little as three years.